1. Overview
In the first two articles , we discovered how to build a simple chatbot using Dialogflow and the concepts of intents , entities , contexts and fulfillement . In this article , we will try to build a chatbot in dialogflow and alimenting it using python .
As a first step , you will extract the content from a document to create a knowledge base, which the chatbot uses to converse with your users about topics found in the knowledge base. This lab uses a Human Resources Manual as the example document. However, this use case can be applied to any type of document: an operations manual, an instruction manual, a policy document, etc.
You use Python data science libraries and the Natural Language API to extract topics and associated policy text from the document. In later labs, you use AppEngine to deploy (i) a Webhook API that queries the text associated with topics, and (ii) a customized front-end for your chat agent. Finally, you add basic authentication to your webhook to allow only secure calls.

2. Objectives
In this lab you will perform the following tasks:
- Use Cloud Datalab, Python, data science libraries, and Google Natural Language API machine learning technology to transform an unstructured text document into a structured knowledge base in Cloud Datastore
- Use Dialogflow to build a conversational agent that can respond to questions about the HR manual
- Populate entities from Datastore into your agent
3. Implementation
Task 1. Enable APIs
For security purposes, many Google Cloud Services are disabled by default (this is referred to as the principle of least privilege.) You must enable the specific APIs needed by this lab before beginning.
- In the GCP Console, on the Navigation menu , click APIs & Services.
- Click Enable APIs and Services.
- Search for Compute Engine, and then select Compute Engine API.
- Click Enable.
- Repeat steps 3 and 4 for Dialogflow API.
- Make sure the following APIs are enabled too (if not already enabled)
- Google Cloud Storage
- Cloud Source Repositories API
- Cloud Natural Language API
Task 2. Initialize App Engine and Cloud Datastore
You use a NoSQL database called Cloud Datastore to store content extracted from the document. To enable Cloud Datastore, enable the associated App Engine service.
- On the Navigation menu , click App Engine > Dashboard.
- Under the Welcome dialog box, click Create Application.
- Accept the default region, and then click Create app.
- For Language, select Python from the dropdown and then click Next to initialize App Engine.
- App Engine takes a few minutes to initialize.
You have now successfully initialized App Engine and Cloud Datastore.
Task 3. Get started with Cloud Datalab
This lab uses several Cloud Datalab notebooks, each of which has a primary function as described below:
Pre-Processing Notebooks
These are each run one time, in order. Their purpose is to extract information from the HR Manual and create a knowledge base that is used by the chatbot to answer questions:
- ProcessHandbook.ipynb performs “semi-structured” analysis on the HR Manual text file. It alternately extracts topic “headings” and associated “policy text” from the file and stores these as key-value pairs in Cloud Datastore to give the chatbot a basic vocabulary.
- ProcessSynonyms.ipynb uses several Python data science libraries and the Cloud Natural Language API to generate synonyms for topics, which gives the chatbot an expanded vocabulary.
- DialogFlow.ipynb uses Dialogflow’s “Entity” API to write the topics to Dialogflow’s Entity module, which makes these words available to the chatbot as a data type.
Set up Cloud Datalab
- From the Google Cloud Platform Console, select your project, and then click Activate Google Cloud Shell
- Cloud Datalab is set up on a Compute Engine VM. For that, you need to specify the project and the zone where the VM is created. Use Cloud Shell as the client to run the installation commands. In cloud Shell, execute the following command:
gcloud config set core/project $GOOGLE_CLOUD_PROJECT
- Run the following command to list zones:
gcloud compute zones list
Please pick a zone in a geographically close region from the following: us-east1, us-central1, asia-east1, europe-west1.
Now you create a Cloud Datalab instance on a VM in the project and zone specified above.
- Run the following command to set the zone:
datalab create datalab-instance --zone <ZONE>
Replace
This command will take a few minutes to complete.
-
If the command prompts you to create SSH keys, type Y.
-
If the command prompts you for an RSA key password, press ENTER twice to confirm. Before continuing, wait for the following text to be displayed: Result (do not copy)
Updating project ssh metadata…done. Waiting for SSH key to propagate.
The connection to Datalab is now open and will remain until this command is killed. Click on the “Web Preview” (up-arrow button at top-left), select port 8081, and start using Datalab.
Note: It could take some minutes for this process to complete. Please be patient as propagation of the SSH keys, etc can take time in a new GCP project.
The connection can time out due to inactivity. If you lose connection to the Datalab instance, restore it as follows:
Instance name can be found from the drop down menu Compute Engine > VM Instances
Then enter the command: **datalab connect
- The previous command creates a connection to your instance. To use that connection to open your browser to the Cloud Datalab notebook listing page, click Web preview
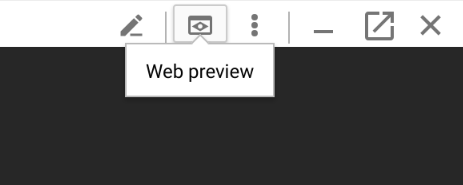 and then click Change port.

- For Port Number, type 8081, and then click Change and Preview.

Cloud Datalab should open in a new browser tab.
Download and open lab notebooks
- To open a new notebook, click +Notebook.
- Paste this code into the notebook cell:
%bash
git clone https://github.com/GoogleCloudPlatform/training-data-analyst
rm -rf training-data-analyst/.git
- Click Run or press SHIFT + ENTER.
View the HR Manual sample text file
- From the Cloud Datalab console, return to the datalab home page (this is running in a separate browser tab).
- Navigate to training-data-analyst > courses > dialogflow-chatbot > notebooks > CAHRC_HR_Manual.txt to view the HR Manual we will use as our “data source” to build the chatbot from. Scroll through and explore the contents of the file.
- You will notice that the file is organized in a semi-structured format, with topic headings followed by blocks of text describing each topic:
Employment Equity [THE ORGANIZATION] is an equal opportunity employer and employs personnel without regard to race, ancestry, place of origin, colour, ethnic origin, language, citizenship, creed, religion, gender, sexual orientation, age, marital status, physical and/or mental handicap or financial ability. While remaining alert and sensitive to the issue of fair and equitable treatment for all, [THE ORGANIZATION] has a special concern with the participation and advancement of members of four designated groups that have traditionally been disadvantaged in employment: women, visible minorities, aboriginal peoples and persons with disabilities.
The first Python Notebook will use this “semi-structured format” to begin extraction of meaning from the document.
- Close the browser tab and return to the main Cloud Datalab tab (again - running in a separate browser tab).
Task 4. Open and execute the ProcessHandbook notebook
This first Python Notebook extracts heading “topics” along with their associated content “action text” from the HR manual text file we just reviewed - and stores these as key-value pairs in Cloud Datastore. This notebook should only be run one time.
- From the Cloud Datalab console, return to the datalab home page and select dialogflow-chatbot > notebooks > ProcessHandbook.ipynb.
- Click the dropdown arrow next to Clear, and then click Clear all Cells.
- Execute the cells individually and observe the results. To move through the cells conveniently, press SHIFT + ENTER and wait for each cell to complete before continuing. Code cell completion is indicated by a blue bar to the left of the cell.
- Once you have executed the last cell on the page, you are finished running this particular notebook and you have extracted the topics from the HR Manual document.
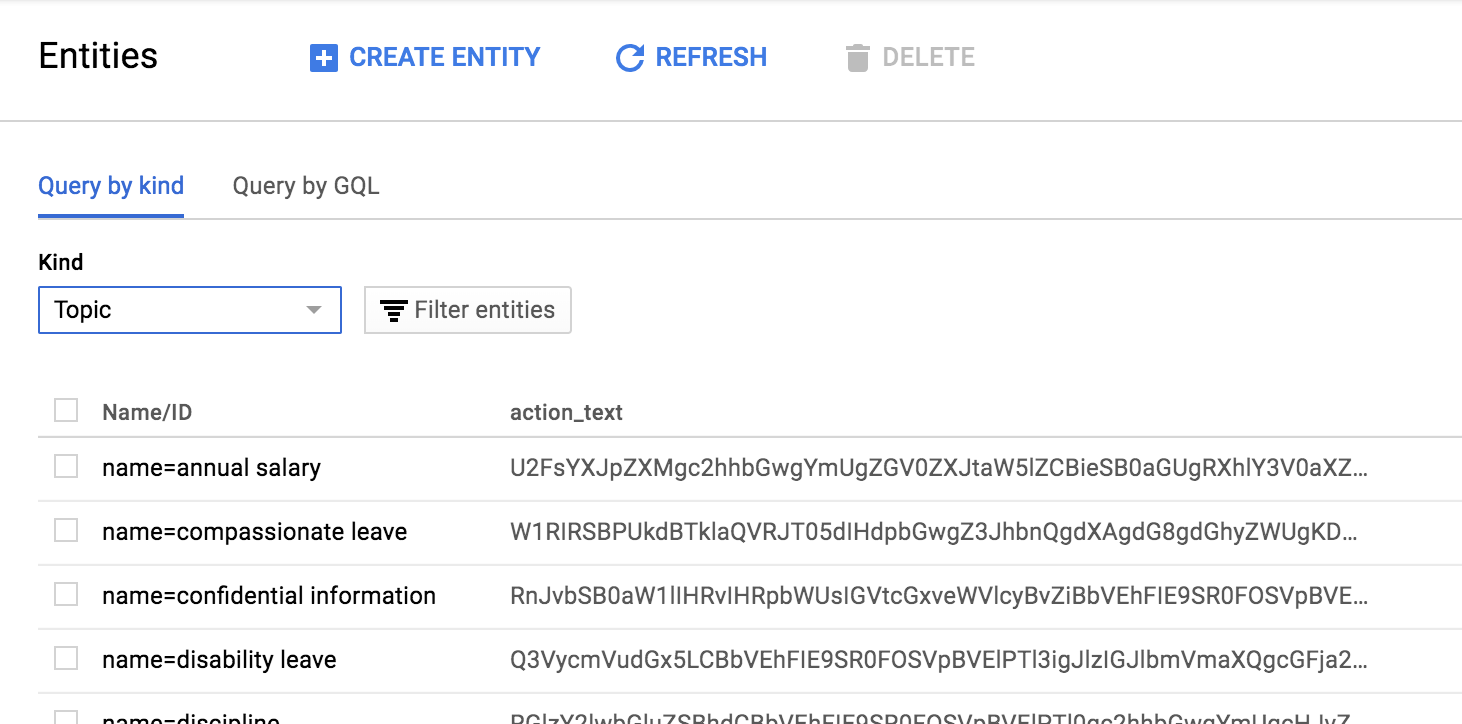
- Now we will review the database you have created. Switch back to the GCP Console (this is probably the first tab in your browser), and on the Navigation menu, clickDatastore > Entities.
- Under Kind, select Topic.Review the topics that were created. Note that the action_text column is automatically encoded by Cloud Datastore. When you query the data, it will automatically be decoded for you:
Task 5. Open and execute the ProcessSynonyms notebook
This second notebook uses Natural Language Processing (NLP) to create additional “synonyms” for the topics extracted in Task 1. These techniques are documented in the notebook itself.
- From the Cloud Datalab console, return to the datalab home page and select dialogflow-chatbot > notebooks > ProcessSynonyms.ipynb.
- Click the dropdown arrow next to Clear, and then click Clear all Cells.
- Execute the cells individually and observe the results. To move through the cells conveniently, press SHIFT + ENTER and wait for each cell to complete before continuing. Code cell completion is indicated by a blue bar to the left of the cell.
This notebook uses the Google Cloud Natural Language API. If you haven’t used this API in this project before, enable it before running the cells.
-
A convenient way to progress through the cells is
Shift + Enter, waiting for each cell to complete before progressing. Code cell completion is indicated by a blue bar on the left of the cell and any output printed below.
-
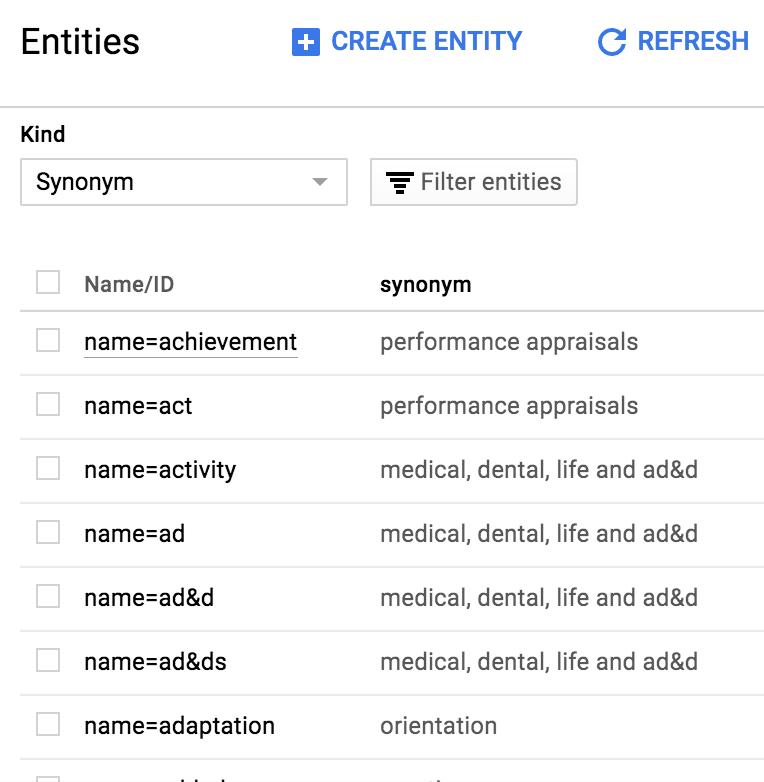
In the Cloud console, navigate to Storage→Datastore→Entities
-
Under Kind select Synonym. Note that it may take several minutes for this data to appear in the web console. Try refreshing the page after waiting a minute or two if the data doesn’t show up right away. Note: It may require a browser refresh in order for the Synonyms entry to show up.
-
Review the synonyms that were created. Note that there are multiple synonyms for each topic you created in the previous notebook. The synonyms are listed under the Name/ID property, and the topics they refer to are listed under the synonym property.
The knowledge base for your chatbot is now complete! A variety of semi-structured and unstructured analysis techniques were used to extract knowledge for the HR manual in text format.
- Close the tab.
Task 6. Create a Dialogflow chatbot (Agent)
You created the knowledge base for your chatbot, and now you will work on the chatbot itself using Dialogflow.
- In a new browser tab, go to http://dialogflow.com.
- Click Go to Console in the upper-right corner.
- When prompted, click Sign in with Google.
- Allow Dialogflow to access your Google Account generated from Qwiklabs (ex: gcp…@qwiklabs.net), and accept the terms of service.
- On the Dialogflow main menu (on the left), click Create Agent.
- In the form, provide the following values:
Agent
Name
HR-Chatbot
Google Project
Under the IMPORT EXISTING GCP PROJECT heading in the dropdown, select your GCP Project - should be of the form “qwiklabs-gcp-
- Click Create.
Great! You’ve created your chatbot. Next you teach it to have a conversation.
Task 7. Create a “Topic” entity
An entity is essentially a data type in Dialogflow that you can use to parameterize conversations. In previous labs, we started with Intents. Here, we do it a little different since we already have a knowledge base. You create an entity called “Topic” that encapsulates all possible HR topics this chatbot can discuss.
- On the main Dialogflow menu, click Entities.
- Click Create Entity.
- For Entity name, type Topic.
- Select Allow automated expansion. This allows your chatbot to recognize Topic values that are not explicitly listed in your data model.
- Clear / uncheck Define synonyms. Your webhook handles synonyms instead.
- Click Enter value and type test. You add more values for Topic in an automated fashion in the next task, but Dialogflow doesn’t allow you to save the entity without at least a single value.
- Click Save.
Task 8. Import topic entities from Cloud Datastore to Dialogflow
This third notebook imports topic entries from Cloud Datastore to Dialogflow.
- In the Cloud Datalab console, return to the datalab home page and select dialogflow-chatbot > notebooks > DialogFlow.ipynb.
- Click the dropdown arrow next to Clear, and then click Clear all Cells.
- Execute the first cell to install the Dialogflow SDK on Cloud Datalab (via updated pip package installer).
- You must restart Python on your notebook server. Click the dropdown next to the Reset button in the Cloud Datalab menu bar, and click Interrupt Execution. Then click the Reset button and click Restart.
- Execute the remaining cells in the notebook. These make API calls to Dialogflow to upload your topics. A list of topics should appear in the notebook output.
- Return to the Dialogflow console and open the Entities tab from the left-hand menu.
- Click @Topic. If you are already on the Topic page, you may need to refresh your browser.
Your entries from Cloud Datastore now populate the Topic entity. Your API calls populated DialogFlow with the topics you extracted from the document!
Task 9. Create and train your intent
- On the Dialogflow menu, click Intents.You only need one intent for your HR chatbot. This intent will respond to requests for information about different HR topics.
- Click Create Intent.
- For Intent name, type Topic.
- Click Add Parameters and Action.
- For Enter action name, type lookup
-
In the Parameters table, for Parameter Name type topic. For Entity type @Topic. And for value, type $topic.This creates a “lookup” action that passes a “topic” parameter to your backend process (webhook), which retrieves information on this topic from the HR Manual.
- Click to expand the Fulfillment section, and then click on Enable Fulfillment.
- Toggle /enable the Enable webhook call for this intent option. Leave the Enable webhook call for slot filling option off.
If you don’t see the webhook option in the Dialogflow menu, Click to expand the Fulfillment section to see the options for Enabling Webhook call.
- Scroll to the top of the page and click Save. You will now train your chatbot to carry on a conversation.
- Under the Training Phrases section and click Add Training Phrases. Type in some sample sentences as shown below. Before pressing ENTER for each sample, highlight the word “discipline” (do not highlight punctuation) with your mouse to trigger a popup menu.
Typing in sample phrases
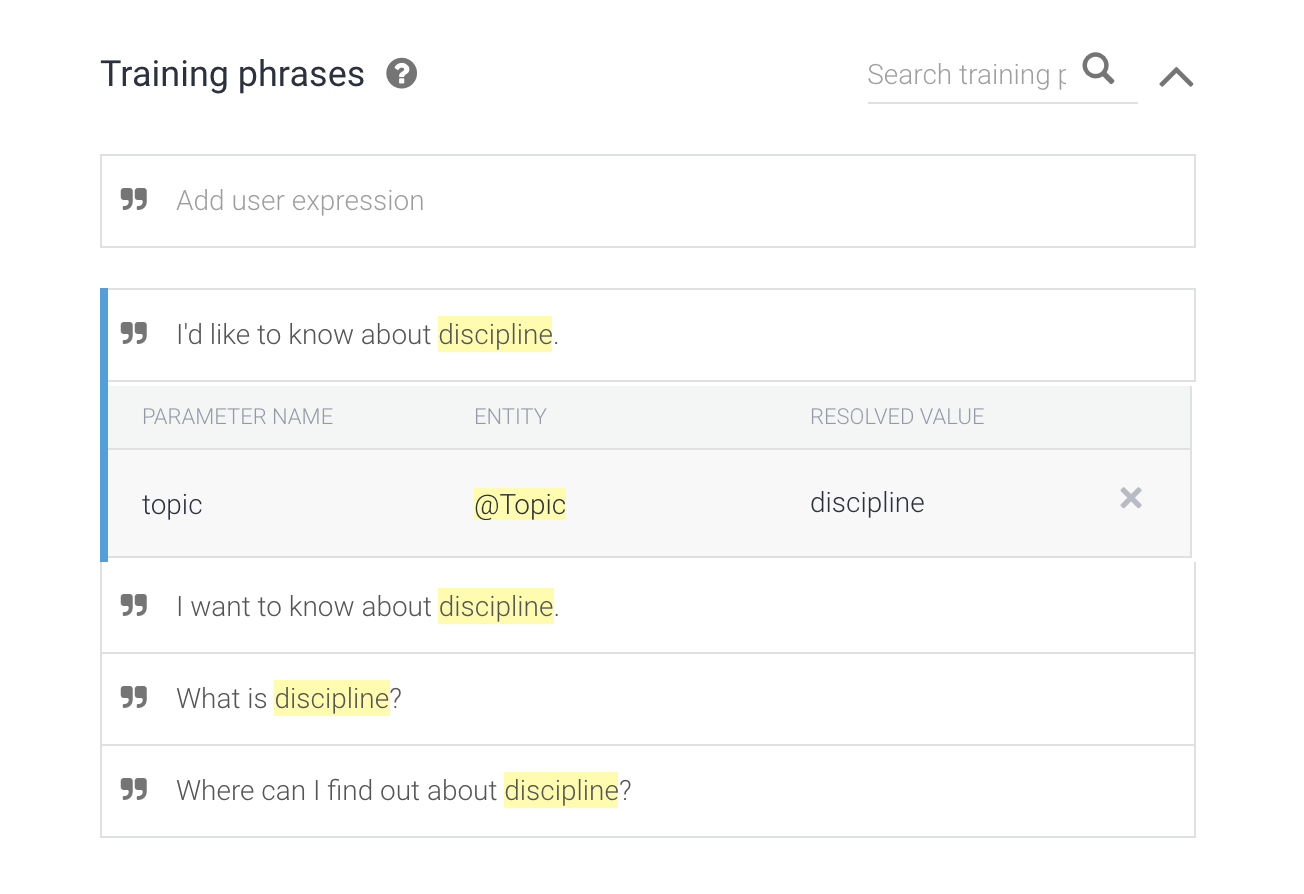
Highlighting “discipline” to trigger popup menu
- Select @Topic:topic from the menu.This tells Dialogflow where in your example sentence to find your topic parameter. After specifying the topic parameter in your sentence, remember to press ENTER to add the sample sentence.
- You can then clear out the Add user expression textbox and continue to add more examples. About 10 is a good number of examples; see suggested examples below. (Be sure to include punctuation in your training examples as illustrated):
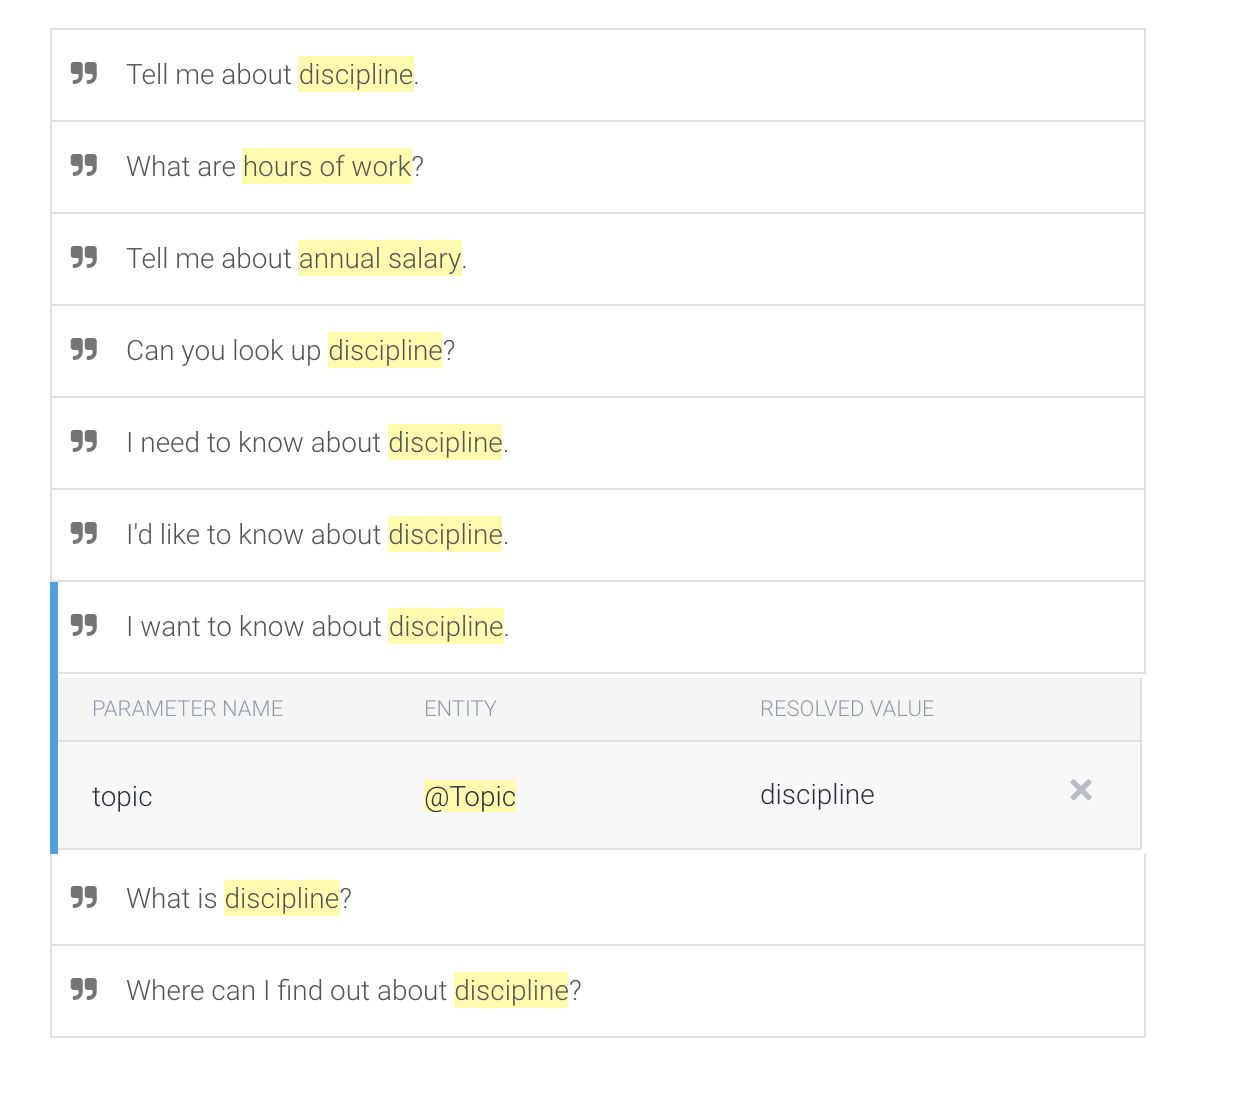
- Click Save. Dialogflow will now train its agent based on your example intentions.
- When Dialogflow indicates that training is complete (the settings gear stops spinning or a notification message is displayed), you are finished training your chatbot.
So far you have created an intent and an entity to match HR topics from our knowledge base. You have indicated in the agent’s configuration that the agent’s response for this intent will be fulfilled with a webhook, so in the next lab you will setup fulfilment to do a lookup from your knowledge base in Datastore. Since you don’t want to repeat the steps to setup your agent’s intent and entity in the next lab, the next task shows you how to export out your agent, so you can import it later.
Task 10: Export your agent
In this section, you will export your agent as a zip file so that you can import it later when you start the next lab. This lets you use the configuration you have created so far instead of having to build the intents and entities you have built in this lab.
- Click on the settings icon next to your agent name in the left menu.
- In the settings page that opens up, go to the Export and Import tab.
- Click on the EXPORT AS ZIP button. This will download your agent into a zip file.